
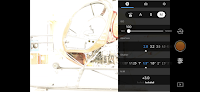
Starting this process both the controller and the drone must be on and connected to control the camera settings. This is simply done by tapping then holding the power button to turn on the controller. Next, connect a device with DJI GO 4.0 to gain the camera's view and settings. Next, on the Right side there above the orange circle there is a camera flip option to switch from video to pictures. This will give you the correct settings for the camera.
What do the camera settings do?
Before going too much farther into the camera settings it would be best to discuss what each setting does and how they interact with one another. First is ISO which is how sensitive the camera's sensor is to light. This is done on a digital camera by increasing/decreasing the voltage to the sensor.
The second setting that should be highlighted is the aperture. This is how wide the lens is opening for the image. This controls the depth of field and also can affect the brightness of the image by not letting in enough light for the sensor to capture the image properly.
The third setting is the shutter speed. Most modern cameras use a rolling shutter, this is in reference to how the sensor captures the image. In a rolling shutter, the sensor "activates" one row of the image capturing pixels at a time and slowly scrolls down to capture the image. The shutter speed is in reference to how fast the scrolling feature is going in seconds
All of these settings can be changed to get an image like figure 1 below, it just means changing the relative ISO, aperture and shutter speed to get that. If you wanted a shutter speed that was super fast, you would need more light to be let into the camera, thus you would increase the aperture, what also would help is making the sensor more sensitive to light by increasing the ISO.
Methods
First to get a control image using auto settings, which generated this image.
 |
| Figure 1 |
 |
| Figure 2 |
 |
| Figure 3 |
 |
| Figure 4 |
 |
| Figure 5 |
 |
| Figure 7 |
 |
| Figure 6 |
 |
| Figure 8 |
Figures 6-8 were when shutter speed was changed Starting at the lowest value, 1/8000 and leaving the ISO and aperture the same as in figure 2, figure 6 is very dark. The light in the hanger wasn't sufficient to lighten the image without changing other settings. Figure 7 is a little more middle ground but is brighter than figure 2. as figure 2 had a shutter speed of 1/50 and figure 7 has a shutter speed of 1/6.25. The final figure, figure 8 has a shutter speed of 1.3 which brightened the image even more than figure 7.
Conclusion
All of these settings can be changed to produce an image like figure 1 and just because the auto settings say to have shutter speed, ISO and aperture at a specific number doesn't mean that's the only settings that can produce an image that will be balanced. These 3 settings can be used to develop an image in the way that is desired.


No comments:
Post a Comment